Overview
Implementing social login is straightforward when the frontend and backend are deployed as a single application. However, when they are developed and hosted independently, the authentication flow becomes more challenging. The backend must securely complete the OAuth 2.0 flow while the frontend provides a seamless user experience, all without exposing sensitive credentials or relying on server-side sessions.
There are three common approaches to solving this problem.
The first is to use an identity and access management (IAM) platform such as Okta, Keycloak, or Clerk. In this model, the IAM platform manages authentication, authorisation, user registration, and session management, allowing both the frontend and backend to delegate identity-related concerns.
The second approach is for both the frontend and backend to integrate directly with the OAuth provider. The frontend initiates the authentication flow, while the backend validates the response and manages application users. Although flexible, this approach requires careful coordination between the two applications when exchanging authorisation codes, access tokens, and user information.
The third approach centralises the entire authentication process in the backend. The backend communicates directly with the OAuth provider, completes the OAuth 2.0 Authorisation Code flow, validates the user’s identity, and issues the application’s own access token. The frontend initiates the login process and uses the issued token to authenticate subsequent API requests. This keeps OAuth client secrets on the server, simplifies the frontend, and provides a clean foundation for stateless authentication.
In this article, we will explore this third pattern in depth and walk through implementing a fully backend-driven social login architecture using Spring WebFlux and Spring Security, demonstrating how to securely manage the OAuth2 flow, handle redirects, and issue stateless access tokens to your frontend application.
Getting Started
Let’s start by creating a new Spring Reactive project using the Spring Initializr tool:
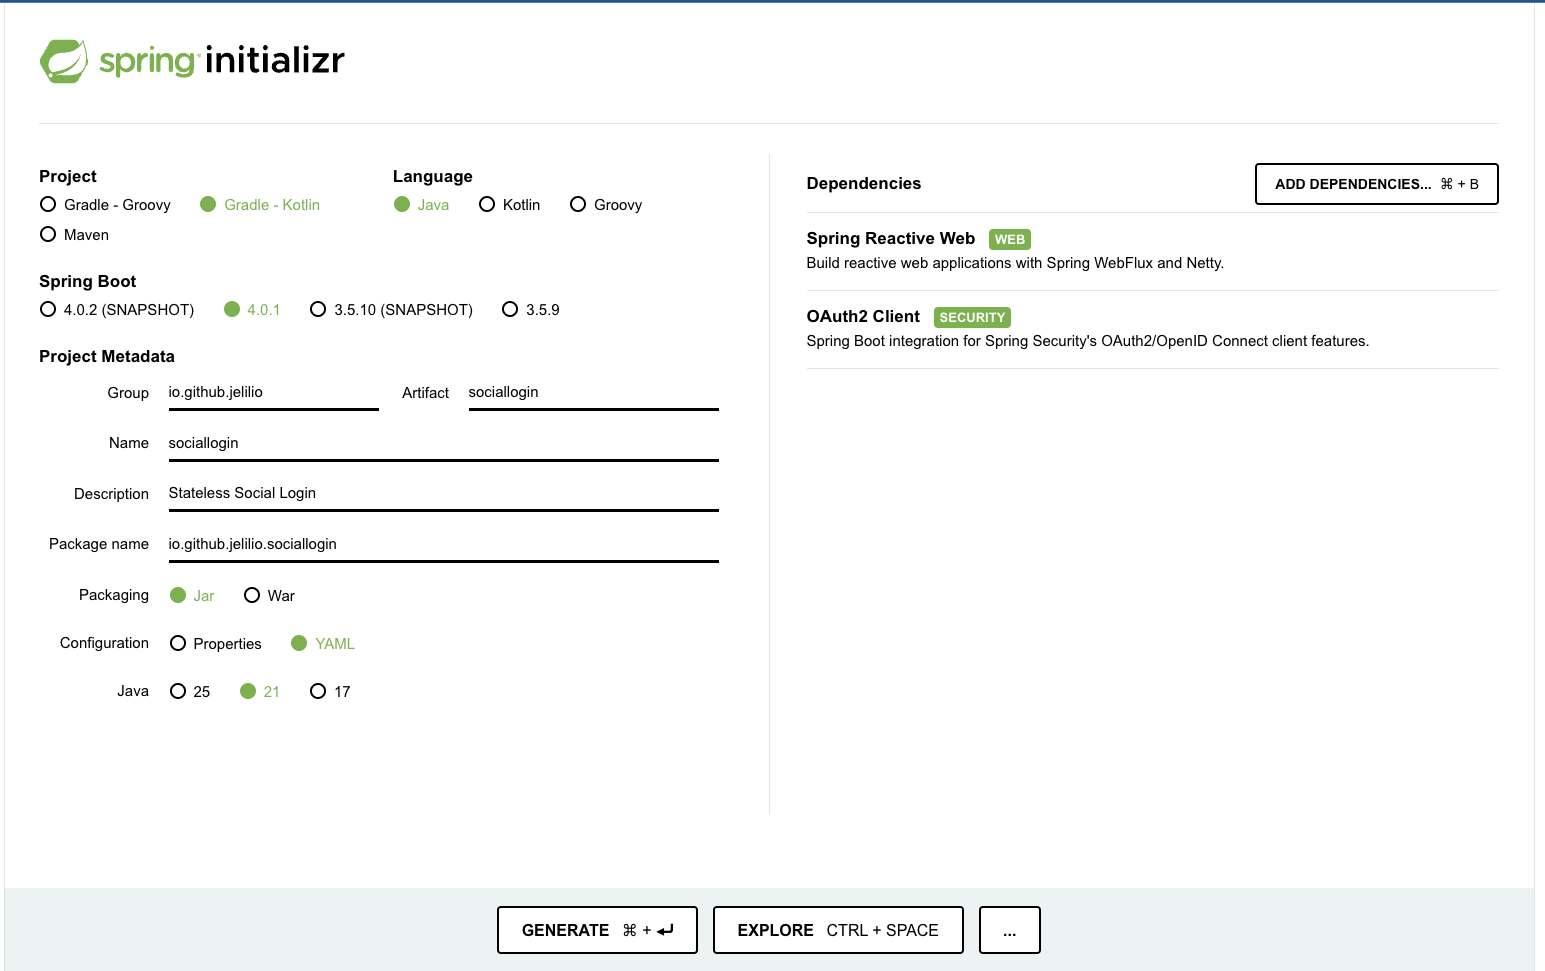
Creating a new Spring Reactive Project with Spring Initializr
If you are a CLI-first developer, you can also create a new Spring project from the terminal using curl or the http command (HTTPie) by running the following command in a clean directory:
curl -G https://start.spring.io/starter.tgz \
  -d "type=gradle-project-kotlin" \
  -d "description=Stateless%20Social%20Login" \
  -d "dependencies=webflux,oauth2-client" \
  -d "javaVersion=21" \
  -d "groupId=io.github.jelilio" \
  -d "artifactId=sociallogin" \
  -d "name=sociallogin" \
  -d "configurationFileFormat=yaml" \
  -d "packageName=io.github.jelilio.sociallogin" \
  | tar -xzvf -
with HTTPie
http https://start.spring.io/starter.tgz \
    type==gradle-project-kotlin \
    description==Stateless%20Social%20Login \
    dependencies==webflux,oauth2-client \
    javaVersion==21 \
    groupId==io.github.jelilio \
    artifactId==sociallogin \
    name==sociallogin \
    configurationFileFormat==yaml \
    packageName==io.github.jelilio.sociallogin \
    --download --output - | tar -xzvf -
At this stage, running the application will display a standard username and password login page. This happens because the oauth2-client dependency triggers Spring Security to configure its default form-based login automatically.
Application Properties Configuration
Spring Boot’s OAuth2 client auto-configuration is triggered by the presence of spring.security.oauth2.client properties. The following YAML configuration registers Google, GitHub, and Facebook clients. As a best practice, the client IDs and secrets are injected via environment variables.
spring:
  application:
    name: social-login
  config:
    import: optional:file:.env[.properties]

  security:
    oauth2:
      client:
        registration:
          github:
            clientId: ${GITHUB_CLIENT_ID}
            clientSecret: ${GITHUB_CLIENT_SECRET}
            scope: user:email
          google:
            clientId: ${GOOGLE_CLIENT_ID}
            clientSecret: ${GOOGLE_CLIENT_SECRET}
            scope:
              - email
              - profile
          facebook:
            clientId: ${FACEBOOK_CLIENT_ID}
            clientSecret: ${FACEBOOK_CLIENT_SECRET}
            scope:
              - email
              - public_profile
Notice the spring.config.import property, as this is required to inject the environment variables provided through the .env configuration file.
GITHUB_CLIENT_ID=
GITHUB_CLIENT_SECRET=

GOOGLE_CLIENT_ID=
GOOGLE_CLIENT_SECRET=

FACEBOOK_CLIENT_ID=
FACEBOOK_CLIENT_SECRET=
If you run the application and try to access the root URL, you will be redirected to a Login page, as all endpoints require authentication by default.
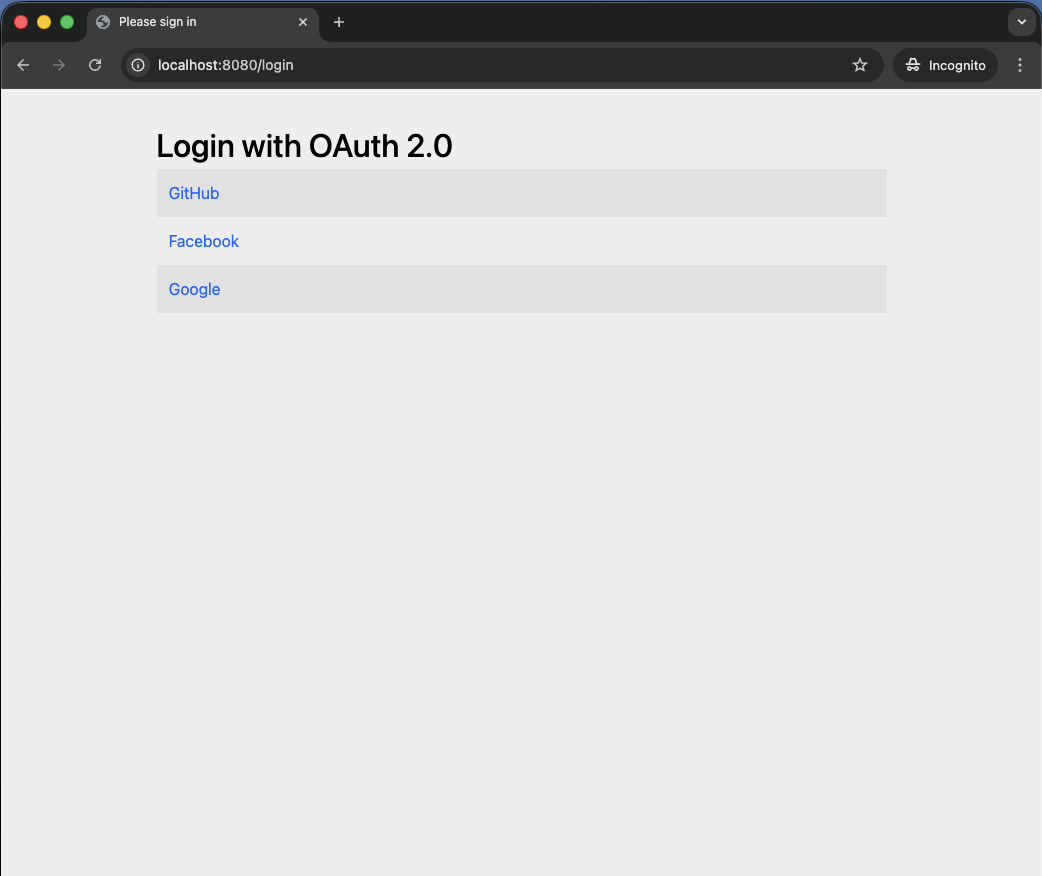
Spring OAuth2 Default Login Page
Clicking any provider link redirects the user to the social login page to authenticate, then returns the user to the index page after a successful login. However, the index page displays a “Whitelabel Error Page” because there are no static resources or a REST controller mapped to the index route.
To see this in action, let’s create a REST controller with a GET request mapped to the “/user-info” route that returns the logged-in user’s details.
@RestController
@RequestMapping("/user-info")
public class UserInfoController {
  @GetMapping
  public Mono<Principal> getUserInfo(Principal principal) {
    return Mono.just(principal);
  }
}
along with a static index.html page.
<!-- /src/main/resources/static/index.html -->
<!DOCTYPE HTML>
<html lang="html">
<head>
    <title>Stateless Social Login</title>
    <meta http-equiv="Content-Type" content="text/html; charset=UTF-8" />
</head>
<body>
<h1>Stateless Social Login</h1>
</body>
</html>
Spring Boot’s auto-configuration handles session-based OAuth 2.0 login entirely out of the box - at this stage, no explicit Java configuration is required at all.
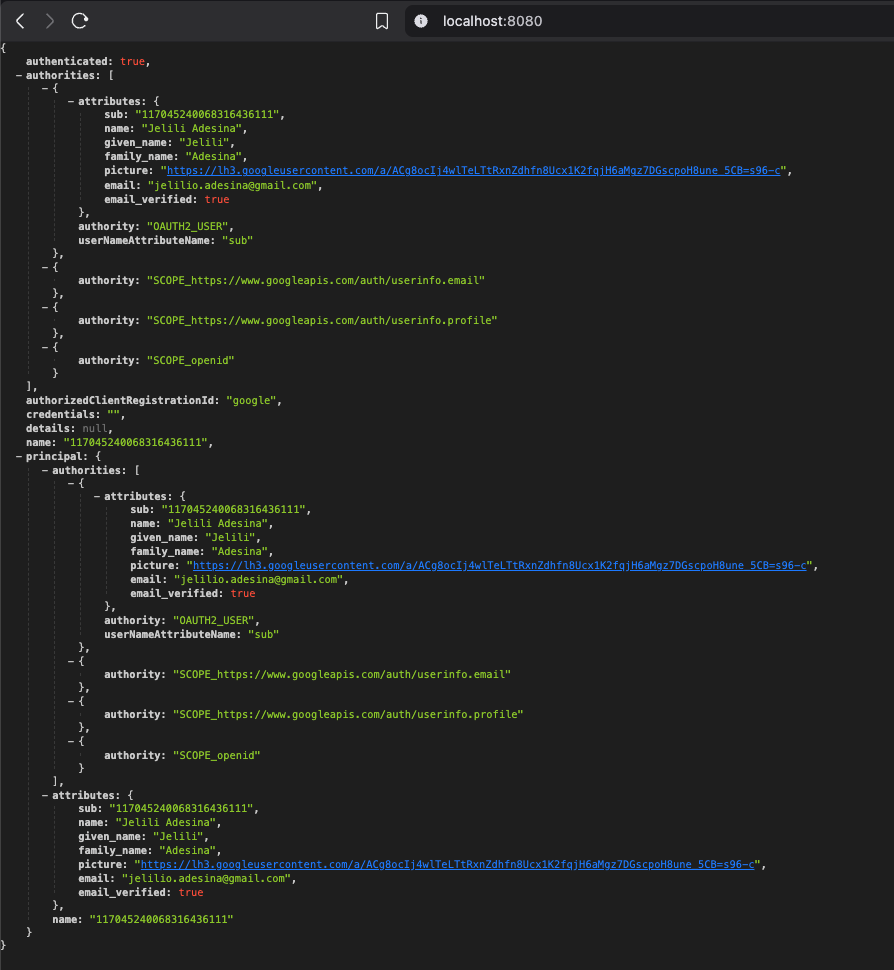
Spring OAuth2 authenticated user’s details
Spring Security’s default OAuth 2.0 login mechanism relies on HTTP sessions to preserve authentication state. Achieving a truly stateless architecture therefore requires replacing this session-based behaviour with JSON Web Tokens (JWTs). Before exploring the custom implementation, let’s first examine how the default login flow works.
The Default Session-Based Login Flow
Spring Security’s default OAuth 2.0 login support is based on the Authorization Code Grant flow. It orchestrates the complete authentication process by handling browser redirects, exchanging the authorization code for an access token, retrieving the authenticated user’s information, and establishing an HTTP session. The authentication sequence is as follows:
- The user selects an OAuth 2.0 provider (for example, GitHub or Google) from the application’s login page.
- Spring Security generates the provider’s authorization URL, including the required OAuth 2.0 parameters such as the
client_id, requested scopes, and a generatedstatevalue. The user’s browser is then redirected to the identity provider’s authorization page. - After the user successfully authenticates and grants the requested permissions, the identity provider redirects the browser back to the application’s callback endpoint, together with the authorization
codeandstateparameters. - Spring Security validates the returned
stateparameter and exchanges the authorizationcodefor an access token with the identity provider. - Using the access token, Spring Security retrieves the authenticated user’s profile details from the identity provider and creates an authenticated principal.
- Finally, Spring Security stores the authenticated principal in the HTTP session, allowing subsequent requests to be authenticated using the existing session rather than repeating the OAuth 2.0 login flow.
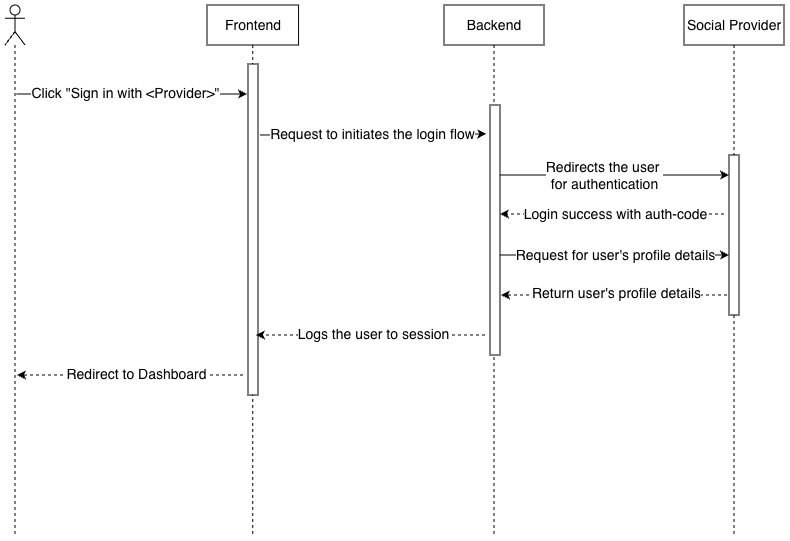
The Default Session-Based Login Flow Sequence Diagram
For the remainder of this article, we will adapt this authentication flow to a stateless architecture in which the resource server does not maintain HTTP sessions.
Spring Security OAuth2 Auto-configuration
To begin the implementation, we override Spring Security’s default OAuth2 login auto-configuration by registering a custom SecurityWebFilterChain bean within the application context.
@Configuration
@EnableWebFluxSecurity
public class SecurityConfig {
  @Bean
  public SecurityWebFilterChain securityWebFilterChain(ServerHttpSecurity httpSecurity) {
    return httpSecurity
        .authorizeExchange(exchanges -> exchanges
            .anyExchange().authenticated())
        .oauth2Login(Customizer.withDefaults())
        .build();
  }
}
This configuration keeps the default social login behavior. Running the app now won’t change anything yet, giving us a clean starting point before we add our custom stateless authentication.
The configuration snippet above explicitly mirrors the out-of-the-box social login behaviour provided by the framework. Consequently, executing the application at this stage preserves the identical authentication flow, establishing a baseline before we introduce our custom stateless handling.
Session Out, Stateless In
As illustrated in the previous section, the OAuth 2.0 login flow itself requires very little state. The only remaining server-side state comes from Spring Security’s use of the HTTP session to preserve the authorization request and the authenticated principal. By replacing these two session-based mechanisms with a stateless authorization request repository and a signed JSON Web Token (JWT), we can make the entire authentication flow stateless.
Before we proceed, let’s disable CSRF since the application will no longer rely on browser-managed authentication sessions.
@Configuration
@EnableWebFluxSecurity
public class SecurityConfig {
  @Bean
  public SecurityWebFilterChain securityWebFilterChain(ServerHttpSecurity httpSecurity) {
    return httpSecurity
	    // disable CSRF
        .csrf(ServerHttpSecurity.CsrfSpec::disable)
        .authorizeExchange(exchanges -> exchanges
            .anyExchange().authenticated())
        .oauth2Login(Customizer.withDefaults())
        .build();
  }
}
Stateless Authorization Request State Management
The OAuth 2.0 authorization flow requires the application to maintain temporary state between the initial authorization request and the callback received from the identity provider. This state allows the application to correlate the authorization response with the original request and verify that the response has not been tampered with.
By default, Spring Security stores the OAuth2AuthorizationRequest in the HTTP session using WebSessionOAuth2ServerAuthorizationRequestRepository, the standard implementation of ServerAuthorizationRequestRepository. During the callback phase, this stored authorization request is retrieved to validate the returned state parameter, ensuring that the response originated from the same authorization flow and protecting the application against Cross-Site Request Forgery (CSRF) attacks.
In a stateless architecture, relying on an HTTP session for temporary authorization state is no longer appropriate. Instead, the authorization request must be stored using a mechanism that does not require server-side state. The session repository can be replaced with HttpCookieAuthorizationRequestRepository, a custom implementation of ServerAuthorizationRequestRepository that serialises the authorization request into a secure, HTTP-only client-side cookie. The cookie is returned with the callback request, allowing the resource server to reconstruct the original authorization request and complete the OAuth 2.0 flow without maintaining session state.
@Component
public class HttpCookieAuthorizationRequestRepository implements ServerAuthorizationRequestRepository<OAuth2AuthorizationRequest> {
  private static final Base64.Encoder B64E = Base64.getUrlEncoder();
  private static final Base64.Decoder B64D = Base64.getUrlDecoder();

  private static final int COOKIE_EXPIRY_SECONDS = 300; // 5 minutes
  public static final String AUTHORIZATION_REQUEST_COOKIE_NAME = "my_oauth2_authorization_request";
  public static final String REDIRECT_URI_COOKIE_PARAM_NAME = "myRedirectUri";
  public static final String CLIENT_ID_COOKIE_PARAM_NAME = "myClientId";

  private final BytesEncryptor encryptor;
  private final ObjectMapper objectMapper;

  public HttpCookieAuthorizationRequestRepository(AppProperties appProperties) {
    this.encryptor = Encryptors.stronger(appProperties.enc().password(), appProperties.enc().salt());
    this.objectMapper = JsonMapper.builder()
        .addModule(new CoreJacksonModule())
        .addModule(new OAuth2ClientJacksonModule())
        .build();
  }

  @Override
  public Mono<OAuth2AuthorizationRequest> loadAuthorizationRequest(ServerWebExchange exchange) {
    return Mono.justOrEmpty(fetchCookie(exchange, AUTHORIZATION_REQUEST_COOKIE_NAME))
        .flatMap(this::decryptAndDeserialize);
  }

  @Override
  public Mono<Void> saveAuthorizationRequest(OAuth2AuthorizationRequest authorizationRequest, ServerWebExchange exchange) {
    if (authorizationRequest == null) {
      deleteCookies(exchange, AUTHORIZATION_REQUEST_COOKIE_NAME, REDIRECT_URI_COOKIE_PARAM_NAME, CLIENT_ID_COOKIE_PARAM_NAME);
      return Mono.empty();
    }

    try {
      String encryptedValue = serializeAndEncrypt(authorizationRequest);
      addCookie(exchange, AUTHORIZATION_REQUEST_COOKIE_NAME, encryptedValue, true);
    } catch (JacksonException e) {
      return Mono.error(new IllegalStateException("Could not serialize OAuth2AuthorizationRequest", e));
    }

    addParamCookie(exchange, REDIRECT_URI_COOKIE_PARAM_NAME);
    addParamCookie(exchange, CLIENT_ID_COOKIE_PARAM_NAME);

    return Mono.empty();
  }

  @Override
  public Mono<OAuth2AuthorizationRequest> removeAuthorizationRequest(ServerWebExchange exchange) {
    return this.loadAuthorizationRequest(exchange)
        .doOnNext(request -> deleteCookies(exchange, AUTHORIZATION_REQUEST_COOKIE_NAME));
  }

  private void addParamCookie(ServerWebExchange exchange, String paramName) {
    String paramValue = exchange.getRequest().getQueryParams().getFirst(paramName);
    if (StringUtils.isNotBlank(paramValue)) {
      addCookie(exchange, paramName, paramValue, false);
    }
  }

  private void addCookie(ServerWebExchange exchange, String name, String value, boolean httpOnly) {
    ResponseCookie cookie = ResponseCookie.from(name, value)
        .path("/")
        .httpOnly(httpOnly)
        .secure(true)
        .sameSite("Lax")
        .maxAge(Duration.ofSeconds(COOKIE_EXPIRY_SECONDS))
        .build();
    exchange.getResponse().addCookie(cookie);
  }

  private void deleteCookies(ServerWebExchange exchange, String... names) {
    for (String name : names) {
      ResponseCookie cookie = ResponseCookie.from(name, "")
          .path("/")
          .httpOnly(true)
          .secure(true)
          .sameSite("Lax")
          .maxAge(0)
          .build();
      exchange.getResponse().addCookie(cookie);
    }
  }

  private Optional<HttpCookie> fetchCookie(ServerWebExchange exchange, String name) {
    return Optional.ofNullable(exchange.getRequest().getCookies().getFirst(name));
  }

  private Mono<OAuth2AuthorizationRequest> decryptAndDeserialize(HttpCookie cookie) {
    try {
      byte[] decodedBytes = B64D.decode(cookie.getValue());
      byte[] decryptedBytes = encryptor.decrypt(decodedBytes);
      String json = new String(decryptedBytes, StandardCharsets.UTF_8);

      return Mono.fromCallable(() -> objectMapper.readValue(json, OAuth2AuthorizationRequest.class))
          .onErrorResume(t -> Mono.error(new RuntimeException(t)));
    } catch (Exception e) {
      return Mono.empty();
    }
  }

  private String serializeAndEncrypt(OAuth2AuthorizationRequest obj) throws JacksonException {
    String json = objectMapper.writeValueAsString(obj);
    byte[] encryptedBytes = encryptor.encrypt(json.getBytes(StandardCharsets.UTF_8));
    return B64E.encodeToString(encryptedBytes);
  }
}
With that in place, we inject an instance of the repository into the SecurityWebFilterChain defined in the SecurityConfig to override the default session-based implementation.
@Configuration
@EnableWebFluxSecurity
public class SecurityConfig {
  private final HttpCookieAuthorizationRequestRepository customAuthorizationRequestRepository;

  // constructor parameters omitted
  // ...

  @Bean
  public SecurityWebFilterChain securityWebFilterChain(ServerHttpSecurity httpSecurity) {
    return httpSecurity
        .csrf(ServerHttpSecurity.CsrfSpec::disable)
        .authorizeExchange(exchanges -> exchanges
            .anyExchange().authenticated())
        .oauth2Login(it -> {
          it.authorizationRequestRepository(customAuthorizationRequestRepository);
        })
        .build();
  }
}
Stateless Authentication State Management
After successful authentication, Spring Security normally creates an authenticated Authentication object and stores it in the SecurityContext. The SecurityContext is then persisted in the HTTP session under the SPRING_SECURITY_CONTEXT attribute. Subsequent requests reuse this session, allowing the user to remain authenticated without re-authenticating.
In a RESTful architecture, authentication state is managed entirely on the client using JSON Web Tokens (JWTs), eliminating the need for server-side sessions. Instead of storing the authenticated principal in an HTTP session, the server generates a signed JWT that contains the user’s identity, roles, and token expiration information. The client then includes this JWT in the Authorization header of every subsequent API request, allowing the server to authenticate and authorise the client without maintaining session state.
For this implementation, a CustomAuthenticationSuccessHandler will extract details from the authenticated Authentication object to generate the corresponding JSON Web Token.
@Component
public class CustomAuthenticationSuccessHandler implements ServerAuthenticationSuccessHandler {
  private final TokenService tokenService;
  private final JsonComponent jsonComponent;

  public CustomAuthenticationSuccessHandler(TokenService tokenService, JsonComponent jsonComponent) {
    this.tokenService = tokenService;
    this.jsonComponent = jsonComponent;
  }

  @NonNull @Override
  public Mono<Void> onAuthenticationSuccess(@NonNull WebFilterExchange webFilterExchange, @NonNull Authentication authentication) {
    return Mono.defer(() -> tokenService.generateToken(authentication)).flatMap(authResponse -> {
      var response = webFilterExchange.getExchange().getResponse();

      response.setStatusCode(HttpStatus.OK);
      response.getHeaders().setContentType(MediaType.APPLICATION_JSON);
      DataBufferFactory dataBufferFactory = response.bufferFactory();

      Mono<String> payloadMono = jsonComponent.convertToJson(authResponse);

      return payloadMono.flatMap(payload -> {
        DataBuffer buffer = dataBufferFactory.wrap(payload.getBytes(Charset.defaultCharset()));
        return response.writeWith(Mono.just(buffer)).doOnError((error) -> DataBufferUtils.release(buffer));
      });
    });
  }
}
Then we update the SecurityConfig to use an instance of the CustomAuthenticationSuccessHandler, thus overriding the default session-based authentication success handler.
@Configuration
@EnableWebFluxSecurity
public class SecurityConfig {
  private final CustomAuthenticationSuccessHandler customAuthenticationSuccessHandler;
  private final HttpCookieAuthorizationRequestRepository customAuthorizationRequestRepository;

  // constructor parameters omitted
  // ...

  @Bean
  public SecurityWebFilterChain securityWebFilterChain(ServerHttpSecurity httpSecurity) {
    return httpSecurity
        .csrf(ServerHttpSecurity.CsrfSpec::disable)
        .authorizeExchange(exchanges -> exchanges
            .anyExchange().authenticated())
        .oauth2Login(it -> {
          it.authenticationSuccessHandler(customAuthenticationSuccessHandler);
          it.authorizationRequestRepository(customAuthorizationRequestRepository);
        })
        .build();
  }
}
In CustomAuthenticationSuccessHandler, the core token creation logic has been extracted into the TokenService class.
@Service
public class TokenService {
  private final JwtEncoder encoder;
  private final AuthProperties authProperties;

  public TokenService(JwtEncoder encoder, AuthProperties authProperties) {
    this.encoder = encoder;
    this.authProperties = authProperties;
  }

  private String generateToken(String subject, Collection<? extends GrantedAuthority> authorities) {
    Instant now = Instant.now();
    String scope = authorities.stream()
        .map(GrantedAuthority::getAuthority)
        .collect(Collectors.joining(" "));

    JwtClaimsSet claims = JwtClaimsSet.builder()
        .id(UUID.randomUUID().toString())
        .issuer(authProperties.issuer())
        .issuedAt(now)
        .expiresAt(now.plus(authProperties.expiration(), ChronoUnit.SECONDS))
        .subject(subject)
        .claim("scope", scope)
        .build();
    JwtEncoderParameters encoderParameters = JwtEncoderParameters.from(
        JwsHeader.with(MacAlgorithm.HS256).build(), claims);
    return this.encoder.encode(encoderParameters).getTokenValue();
  }

  public Mono<AuthenticationResponse> generateToken(Authentication authentication) {
    return Mono.just(new AuthenticationResponse(generateToken(authentication.getName(), authentication.getAuthorities())));
  }
}
The JwtEncoder is configured as a bean and is responsible for cryptographically signing and encoding the token claims into a secure JSON Web Token (JWT) string.
@Configuration
public class JwtConfig {

  private final AuthProperties authProperties;

  public JwtConfig(AuthProperties authProperties) {
    this.authProperties = authProperties;
  }

  @Bean
  public JwtEncoder jwtEncoder() {
    return new NimbusJwtEncoder(new ImmutableSecret<>(authProperties.key().getBytes(StandardCharsets.UTF_8))));
  }
}
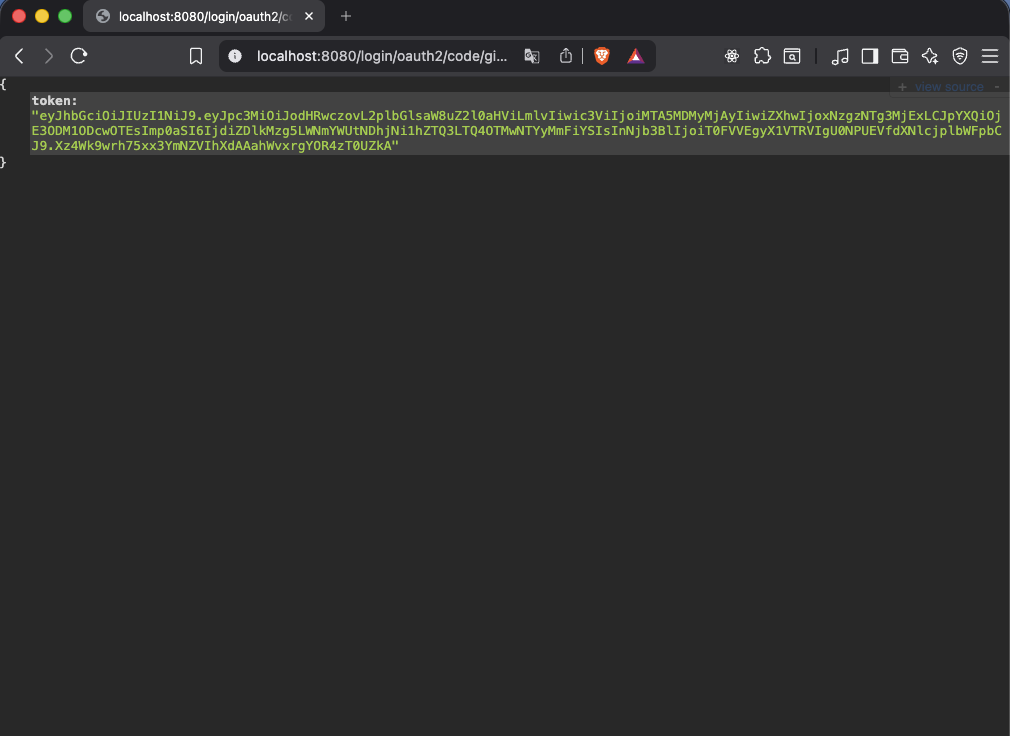
Generated login token
Accessing the Secured Endpoints
Now that the authorization request is stateless and the application can successfully issue a JWT after a user has authenticated, the token cannot yet be used to access protected endpoints because Spring Security has not been configured to authenticate incoming requests using JWTs.
One way to achieve this is to implement a custom WebFilter and register it at the AUTHENTICATION phase of the reactive security filter chain. The filter intercepts each incoming request, extracts the JWT, validates it, and establishes the authenticated security context.
However, beginning with Spring Security 6.x, a more robust and maintainable approach is to leverage the framework’s built-in OAuth 2.0 Resource Server support for JWT authentication. This eliminates the need for a custom authentication filter, as Spring Security provides comprehensive support for decoding, validating, and authenticating JWTs.
Spring Security’s JWT support is enabled by adding the spring-boot-starter-oauth2-resource-server dependency to the project.
implementation("org.springframework.boot:spring-boot-starter-oauth2-resource-server")
The next piece is to define a ReactiveJwtDecoder bean. This component decodes JWTs, validates their signatures, and verifies their authenticity before Spring Security accepts them.
@Configuration
public class JwtConfig {

  private final AuthProperties authProperties;

  public JwtConfig(AuthProperties authProperties) {
    this.authProperties = authProperties;
  }

  //...

  @Bean
  public ReactiveJwtDecoder jwtDecoder() {
    byte[] bytes = authProperties.key().getBytes(StandardCharsets.UTF_8);
    SecretKeySpec originalKey = new SecretKeySpec(bytes, "HmacSHA256");
    return NimbusReactiveJwtDecoder.withSecretKey(originalKey)
        .macAlgorithm(MacAlgorithm.HS256)
        .build();
  }
}
Spring Security automatically detects the configured ReactiveJwtDecoder bean and uses it to enable JWT-based authentication within the SecurityWebFilterChain.
@Configuration
@EnableWebFluxSecurity
public class SecurityConfig {
  private final CustomAuthenticationSuccessHandler customAuthenticationSuccessHandler;
  private final HttpCookieAuthorizationRequestRepository customAuthorizationRequestRepository;

  // constructor parameters omitted
  // ...

  @Bean
  public SecurityWebFilterChain securityWebFilterChain(ServerHttpSecurity httpSecurity) {
    return httpSecurity
        .csrf(ServerHttpSecurity.CsrfSpec::disable)
        .authorizeExchange(exchanges -> exchanges
            .anyExchange().authenticated())
        .oauth2Login(it -> {
          it.authenticationSuccessHandler(customAuthenticationSuccessHandler);
          it.authorizationRequestRepository(customAuthorizationRequestRepository);
        })
        .oauth2ResourceServer(oauth2 -> oauth2.jwt(Customizer.withDefaults()))
        .build();
  }
}
The OAuth2 Redirect
In the default OAuth 2.0 login flow, selecting a “Login with [Provider]” option initiates a request to /oauth2/authorization/{registrationId}, where registrationId identifies the configured OAuth 2.0 provider (for example, github or google). The request is intercepted by OAuth2AuthorizationRequestRedirectWebFilter, which constructs the provider’s authorization request by including the client identifier (client_id), the requested scopes, and a cryptographically generated state parameter to protect against Cross-Site Request Forgery (CSRF) attacks.
Once the authorization request has been created, OAuth2AuthorizationRequestRedirectWebFilter delegates the redirect to DefaultServerRedirectStrategy, an implementation of ServerRedirectStrategy. The user’s browser is then redirected to the identity provider’s authorization page, where the user authenticates and grants the requested permissions. Upon successful authentication, the identity provider redirects the user back to the application’s callback endpoint to continue the OAuth 2.0 login flow.
For single-page applications (SPAs) and other RESTful architectures, a different approach is often preferable. Rather than allowing Spring Security to handle browser redirects, the frontend initiates the authorization request directly and receives the callback from the identity provider. The frontend then forwards the authorization response parameters, which typically include the authorization code and state, to the backend through a dedicated API endpoint, allowing the server to complete the OAuth 2.0 authorization code exchange. This approach gives the frontend full control over the user experience while allowing the backend to securely perform the sensitive aspects of the OAuth 2.0 login flow.
Spring Security’s default redirect strategy is replaced with a custom ServerRedirectStrategy that returns the provider’s authorization URL as a JSON payload. The frontend can then use this URL to initiate the request.
@Component
public class CustomServerRedirectStrategy implements ServerRedirectStrategy {
  private final JsonComponent jsonComponent;

  public CustomServerRedirectStrategy(JsonComponent jsonComponent) {
    this.jsonComponent = jsonComponent;
  }

  @Override
  public Mono<Void> sendRedirect(ServerWebExchange exchange, URI location) {
    return Mono.defer(() -> Mono.just(exchange.getResponse())).flatMap((response) -> {
      response.setStatusCode(HttpStatus.OK);
      response.getHeaders().setContentType(MediaType.APPLICATION_JSON);
      DataBufferFactory dataBufferFactory = response.bufferFactory();

      Mono<String> payloadMono = jsonComponent.convertToJson(new RedirectStrategyPayload(location.toString()));

      return payloadMono.flatMap(payload -> {
        DataBuffer buffer = dataBufferFactory.wrap(payload.getBytes(Charset.defaultCharset()));
        return response.writeWith(Mono.just(buffer)).doOnError((error) -> DataBufferUtils.release(buffer));
      });
    });
  }
}
Inject it into the SecurityConfig
@Configuration
@EnableWebFluxSecurity
public class SecurityConfig {
  private final CustomServerRedirectStrategy customServerRedirectStrategy;
  private final CustomAuthenticationSuccessHandler customAuthenticationSuccessHandler;
  private final HttpCookieAuthorizationRequestRepository customAuthorizationRequestRepository;

  // constructor parameters omitted
  // ...

  @Bean
  public SecurityWebFilterChain securityWebFilterChain(ServerHttpSecurity httpSecurity) {
    return httpSecurity
        .csrf(ServerHttpSecurity.CsrfSpec::disable)
        .authorizeExchange(exchanges -> exchanges
            .anyExchange().authenticated())
        .oauth2Login(it -> {
          it.authorizationRedirectStrategy(customServerRedirectStrategy);
          it.authenticationSuccessHandler(customAuthenticationSuccessHandler);
          it.authorizationRequestRepository(customAuthorizationRequestRepository);
        })
        .build();
  }
}
The Stateless Login Flow
At this stage, the stateless OAuth 2.0 login flow is fully implemented. Unlike Spring Security’s default session-based approach, the frontend orchestrates the browser redirects, while the backend remains responsible for the security-critical aspects of the OAuth 2.0 Authorization Code flow and JWT issuance. The complete authentication sequence is as follows:
- The user selects an OAuth 2.0 provider (for example, GitHub or Google) from the frontend login page.
- The frontend sends a REST request to the resource server requesting an authorization URL for the selected provider.
- The resource server constructs the provider’s authorization URL, including the required OAuth 2.0 parameters such as the
client_id, requested scopes, and a generatedstatevalue. It then returns the URL in a JSON response. - The frontend reads the response and redirects the user’s browser to the identity provider’s authorization page.
- After the user successfully authenticates and grants the requested permissions, the identity provider redirects the browser back to the frontend with the authorization response, including the authorization
codeandstateparameters. - The frontend forwards the authorization response to a dedicated callback endpoint on the resource server.
- The resource server validates the returned
stateparameter, exchanges the authorizationcodefor an access token, and retrieves the authenticated user’s profile details from the identity provider. - After the user’s identity has been successfully verified, the resource server completes the authentication process by issuing a signed JSON Web Token (JWT) to the frontend.
- The frontend stores the JWT and includes it in the
Authorizationheader of subsequent API requests, allowing the resource server to authenticate each request without maintaining server-side session state.
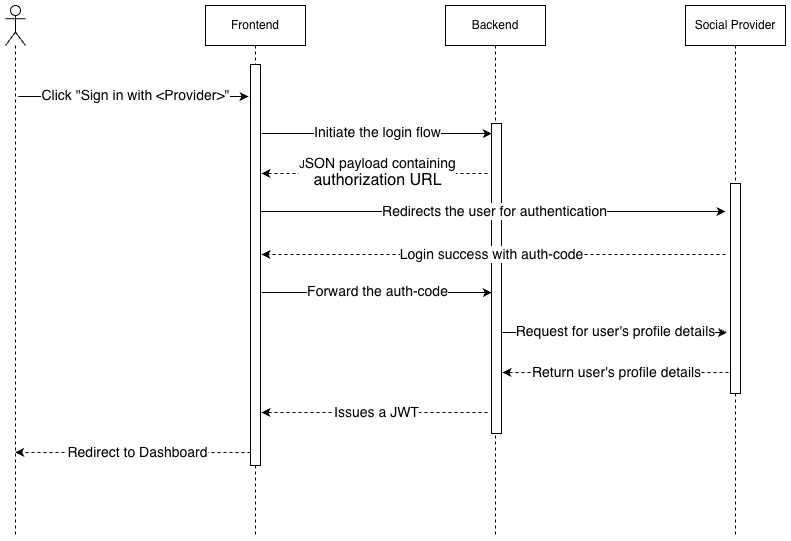
The Stateless Login Flow Sequence Diagram
User Provisioning
After Spring Security exchanges the authorization code for an access token and retrieves the user’s profile information (step 7 above), the application must determine whether the authenticated user already exists in its local database. If the user does not exist, a new record should be created before authentication is completed. This process is commonly referred to as user provisioning.
Spring Security provides two reactive implementations for retrieving user information from the identity provider: DefaultReactiveOAuth2UserService for OAuth 2.0 providers and OidcReactiveOAuth2UserService for OpenID Connect (OIDC) providers. These services are responsible for obtaining the user’s profile information and constructing either an OAuth2User or an OidcUser instance.
Although these implementations retrieve the authenticated user’s details, they do not persist them to a local data store. Extending or delegating these services to custom implementations enables the application to provision users during authentication. The custom implementation checks whether a user with the authenticated email address already exists and, if not, creates a new record before returning the corresponding OAuth2User or OidcUser.
For demonstration purposes, the examples in this article use a custom repository backed by a HashMap to simulate a local database.
@Repository
public class UserRepository {
  private final Map<String, User> userCache = new ConcurrentHashMap<>();

  public Mono<User> findByEmail(String email) {
    return Mono.justOrEmpty(userCache.get(email));
  }

  public Mono<User> save(String name, String email, String registrationId, Boolean verified) {
    var user = new User(name, email, verified, registrationId, Set.of("ROLE_USER"));
    this.userCache.put(email, user);
    return Mono.justOrEmpty(user);
  }
}
Next, provide an extension of DefaultReactiveOAuth2UserService
@Component
public class CustomReactiveOAuth2UserService extends DefaultReactiveOAuth2UserService implements CustomReactiveUserService {
  private final UserRepository userRepository;

  public CustomReactiveOAuth2UserService(UserRepository userRepository) {
    this.userRepository = userRepository;
  }

  @Override
  public Mono<OAuth2User> loadUser(OAuth2UserRequest userRequest) throws OAuth2AuthenticationException {
    String registrationId = userRequest.getClientRegistration().getRegistrationId();

    return super.loadUser(userRequest).flatMap(oAuth2User -> {
      Map<String, Object> attributes = oAuth2User.getAttributes();
      String email = (String) attributes.get(StandardClaimNames.EMAIL);
      Boolean emailVerified = (Boolean) attributes.get(StandardClaimNames.EMAIL_VERIFIED);

      return createOrLoadUser(email, registrationId, emailVerified, oAuth2User)
          .map(it -> new CustomOauth2User(oAuth2User));
    });
  }

  @Override
  public UserRepository getUserRepository() {
    return userRepository;
  }
}
and OidcReactiveOAuth2UserService,
@Component
public class CustomReactiveOidcUserService extends OidcReactiveOAuth2UserService implements CustomReactiveUserService {
  private final UserRepository userRepository;

  public CustomReactiveOidcUserService(UserRepository userRepository) {
    this.userRepository = userRepository;
  }

  @Override
  public Mono<OidcUser> loadUser(OidcUserRequest userRequest) throws OAuth2AuthenticationException {
    String registrationId = userRequest.getClientRegistration().getRegistrationId();

    return super.loadUser(userRequest).flatMap(oidcUser -> {
      String email = oidcUser.getEmail();
      Boolean emailVerified = oidcUser.getEmailVerified();

      return createOrLoadUser(email, registrationId, emailVerified, oidcUser)
          .map(it -> new CustomOauth2User(oidcUser));
    });
  }

  @Override
  public UserRepository getUserRepository() {
    return this.userRepository;
  }
}
Because both implementations share the same provisioning behaviour, the common functionality is extracted into a reusable CustomReactiveUserService. This service encapsulates the logic for looking up an existing user, creating a new user if needed and mapping the authenticated principal to the application’s domain model.
public interface CustomReactiveUserService {
  UserRepository getUserRepository();

  default Mono<User> createOrLoadUser(String email, String registrationId, Boolean emailVerified, OAuth2User oauth2User) {
    Map<String, Object> attributes = oauth2User.getAttributes();

    return getUserRepository().findByEmail(email).map(user -> {
      return user;
    }).switchIfEmpty(Mono.defer(() -> {
      String name = (String) attributes.get(StandardClaimNames.NAME);

      return getUserRepository().save(name, email, registrationId, emailVerified);
    }));
  }
}
These custom OAuth2 user services are registered as Spring beans. During the OAuth2 login flow, Spring Security delegates user information retrieval to the appropriate service implementation. OAuth 2.0 providers like GitHub and Facebook use the CustomReactiveOAuth2UserService, while OpenID Connect providers like Google use the CustomReactiveOidcUserService.
Retrieving the User’s Email Address from GitHub
At this point, attempting to sign in with GitHub may result in the authenticated user’s email address being null. This typically occurs when the user has chosen to keep their email address private by enabling GitHub’s “Keep my email addresses private” setting or by not exposing a public email address on their profile.
An additional request to GitHub’s /user/emails endpoint is required after the user’s profile details have been retrieved. The endpoint returns the email addresses associated with the authenticated account, allowing the application to identify and use the user’s primary verified email address.
@Component
public class GitHubLoginProvider implements SocialLoginProvider {
  private final GitHubProxy gitHubClientProxy;

  public GitHubLoginProvider(GitHubProxy gitHubClientProxy) {
    this.gitHubClientProxy = gitHubClientProxy;
  }

  public String getRegistrationId() {
    return "github";
  }

  @Override
  public Mono<Pair<String, Boolean>> getPrimaryEmailAddress(Map<String, Object> attributes, String token) {
    return gitHubClientProxy.getPrimaryEmailAddress(token)
        .mapNotNull(responses -> {
          if (responses.isEmpty()) {
            return null;
          }

          return responses.stream()
              .filter(GitHubEmailResponse::primary)
              .findFirst()
              .map(it -> Pair.of(it.email(), it.verified()))
              .orElse(null);
        });
  }
}
The GitHubLoginProvider is a concrete implementation of SocialLoginProvider for GitHub, and encapsulates the logic required to retrieve the authenticated user’s primary email address from GitHub’s /user/emails endpoint. The getPrimaryEmailAddress(...) method delegates the request to GitHubProxy, which invokes the GitHub API using the access token obtained during authentication.
Next, update the CustomReactiveOAuth2UserService to retrieve the user’s primary email address.
@Component
public class CustomReactiveOAuth2UserService extends DefaultReactiveOAuth2UserService implements CustomReactiveUserService {
  private final UserRepository userRepository;
  private final Map<String, SocialLoginProvider> loginProviders;

  public CustomReactiveOAuth2UserService(UserRepository userRepository, List<SocialLoginProvider> loginProviders) {
    this.userRepository = userRepository;
    this.loginProviders = loginProviders.stream().collect(Collectors.toMap(
        SocialLoginProvider::getRegistrationId,
        Function.identity()
    ));
  }

  @Override
  public Mono<OAuth2User> loadUser(OAuth2UserRequest userRequest) throws OAuth2AuthenticationException {
    String registrationId = userRequest.getClientRegistration().getRegistrationId();

    return super.loadUser(userRequest).flatMap(oAuth2User -> {
      Map<String, Object> attributes = oAuth2User.getAttributes();
      Mono<Pair<String, Boolean>> emailObjMono = getPrimaryEmail(registrationId, attributes,
          userRequest.getAccessToken().getTokenValue());

      return emailObjMono.flatMap(emailObj -> {
        String email =  emailObj.getLeft();
        Boolean emailVerified = emailObj.getRight();

        return createOrLoadUser(email, registrationId, emailVerified, oAuth2User)
            .map(it -> new CustomOauth2User(it, oAuth2User));
      });
    });
  }

  private Mono<Pair<String, Boolean>> getPrimaryEmail(String registrationId, Map<String, Object> attributes, String token) {
    SocialLoginProvider provider = loginProviders.get(registrationId);

    if(provider == null) {
      return Mono.just(Pair.of((String) attributes.get(StandardClaimNames.EMAIL), false));
    }

    return provider.getPrimaryEmailAddress(attributes, token);
  }

  @Override
  public UserRepository getUserRepository() {
    return userRepository;
  }
}
Using the Strategy pattern, the service delegates provider-specific email retrieval to the appropriate SocialLoginProvider implementation at runtime, allowing each provider to encapsulate its own logic while keeping the authentication flow extensible and free of provider-specific conditional logic.
Demonstration
To conclude this article, the following demonstration videos showcase the completed stateless OAuth 2.0 login implementation in action.
Conclusion
In this article, we implemented a stateless OAuth 2.0 login solution for a Spring WebFlux application by centralising authentication on the backend and securing protected resources with JWTs. By leveraging Spring Security’s native OAuth 2.0 Login and Resource Server capabilities, we minimised custom boilerplate while maintaining a reactive, scalable, and secure architecture. This approach provides a robust foundation for modern applications where frontends and backends are deployed independently.
You can find the complete source code on GitHub.